31 October 2011

Almost Spooky Stuff

I don't know the historical significance of Halloween {and I probably never will} but I do know I love the cheap imported products! It's not festive, it's not pretty, it's not even significant {to me} but Halloween is without a doubt the best fun around.


My kids decorated this with some stuff from the two dollar store and it looked very spooky in the dark. 


The ghosts can only been seen at night ... rightly so. Fyn just stuck them inside the lampshade with blutak, simple and effective. 


And even though I knew they were fake and I knew they were there, they still freaked me out whenever I walked past, a whole bag of black spiders for $2. They're scattered all over the house now so I assume they will randomly scare everyone. 

A sweet friend organised for a large group of Twilight lovers {yes I'm one those girls} to see the new movie together. She thought a DVD marathon was a good idea to refresh our memories {and recommit to our teams.}


What to drink? B+ of course!


I did the usual drinks buffet with some red candles, apples and chocolates for a twilight touch. I also stole an idea from my sister who had a pink chocolate fountain at her daughters pool party. I can't believe I never thought of that, genius! I thought a red chocolate fountain {you know, for blood} would be a bit gross and yummy. So I was just finishing up my red chocolate which was about 4 blocks of good quality white chocolate an entire bottle of red food colouring and a touch of black to get that deep red colour, when I heard a blood curdling scream {dramatic effect added}. My baby had hit his chin and bitten his tongue. So while I was mopping up the real blood, the chocolate blood burned. Such a shame!


Luckily I store chocolate like it's the end of the world, sadly not red food colouring so I had to settle for milk chocolate. Not spooky at all, but definitely yummy. And for the record I am team Jacob {most of the time.}


And this is the edible graveyard I made for the kids.


Ingredients: brownies, chocolate custard, shortbread, chocolate finger biscuits, oreos, brocolini and white chocolate. I also bought some chocolate candy rocks. 


How quickly it all fell apart because at this early stage I realised I did not have enough packet chocolate icing to cover my sponge and I couldn't be bothered to make any. Why didn't I just buy chocolate sponge? I've said it before, not a genius. So carry on it's not like the kids are going to care anyway. 


Cut around the coffins then hollow them out. Fill with chocolate custard and all sorts of freaky stuff like spiders, worms, G.I Joe legs etc. I used a couple of lolly grubs. {Tombstones and dirt made the same way as the science party rocks} Dip the shortbread into black coloured chocolate and use black icing gel to write on your tombstones. Cover everything in Oreo dirt and flash forward to this.


Try to ignore the exposed sponge!


This $2 toy laughed wickedly and had flashing eyes. Very cool.


This is a yummy way to dig your own grave! I find it much easier to make food pretty rather than ugly but I'm still happy with how it turned out. And in case you were wondering, no they did not eat the brocolini grass.


26 October 2011

Bakery Love

Some people LOVE chocolate {as do I} but a block of chocolate can sit in my home for two weeks untouched. A finger bun on the other hand ... or a cookie, or a tart, pie, bread roll, brownie, fruit flan, slice, cupcake and all the other aromatic wonders that a bakery has to offer, well they don't even make it home! You wont find a girl who loves a bakery treat more than me. And a little while ago I discovered the most gorgeous bakery. 


Miette. I love everything that owner Meg believes in when it comes to cakes and just like the cakes the bakeries {there is more than one} are decorated in the most beautiful way. So I used the bakery as inspiration for Mias birthday party this year. They also have a cookbook just released that I am definitely getting.


Now that is a cake. Luscious tempting and sweet to behold. When it comes to kids birthday cakes I am usually a more is more kind of girl. But I fell in love with this immediately. So this is my MIAette bakery. 


I finally got a mirror over my buffet and it looks great but I wanted to cover it for the party. Having the mirror actually makes it possible to hang fabric as a background, I found a fabric that looks like the wallpaper in the bakery and just stuck it at the top of the mirror with tape and tucked it in at the edges. I did a small version of those pom poms again and added a $3 lantern.

I wanted to do patisserie style treats much like this. 


Ooh La La. But a pastry chef I am not. So I set about designing pretty food that didn't require any effort. At all. And I kid you not it was the easiest party food I have ever done. Usually the night before a party my kitchen looks like a disaster zone. Frosting on everything, batter, cookie dough, sprinkles and all sorts spread everywhere. But this was so easy I kept thinking I was forgetting something. Everything came from a packet or a jar and I just put it all together and made it look pretty. 


These are 'wobbles' cups. Wobbles is made by aeroplane jelly and you can find it right next to the jelly in the supermarket. My kids LOVE it. You make it exactly the same as Jelly but add milk instead of cold water, it tastes just like a milkshake with the texture of jelly, so easy it even sets really fast. This is banana and strawberry with a marshmallow on top. Dip the marshmallow in water and roll in sprinkles. 


Party bags from here.


You would think the kids would go straight for the bakery treats but they all rushed for the jelly beans and lolly bracelets first. My kids are always reminding me that simple is best.  


Ok from left to right: Mini cupcakes from a packet mix, melted chocolate and a single concho on top. Packet mix brownie, with a sliver of dollop cream {comes ready to dollop} and a chocolate freckle on top. Mini cupcakes again with ready made packet frosting and a sugar flower on top. Packet tart shell filled with dollop cream and lemon zest topped with a raspberry and sprinkled with icing sugar. Tart at the back is filled with lemon butter {from a jar} and topped with meringue {which I did beat myself} Here are these chocolate cups again you can now buy them pre-filled for an extra .50c but to be honest the ones I filled myself tasted way better. 


And here she is before the party posing {trying to sneak a treat}.


01 October 2011

Science mad - not mad science

OK so my son turned 8 and he asked for a science party {not that he has ever shown any interest in science before.} Sounded easy. Except I was severely let down by my ever trusty best friend Google. Not many people have had the kind of party I was searching for. Lots of people have had mad science parties, which would be really fun for halloween, unfortunately not what my son wanted. Fussy for someone who doesn't do any of the work!

So I decorated the best I could with the theme, which after research I decided was tricky and incredibly BORING! No offence to any scientists, I'm sure your smarter than me. I could barely work out the websites that sold laboratory supplies. So what to do? 

Science food? No such thing. In the end I went with the {sort of} obvious volcano cake that erupts and spews out lava. A spider station so the kids could concoct there own colourful drinks. Cake pops that looked like rocks {the ugliest and most boring kind of cake pops you'll ever see} exploding cookies {covered in pop rocks} and official looking labels and warning signs. 

Science decorations? A black board, a white sheet and lots of aluminium foil. 

Science games? Well that was definitely not boring. 
Rocket Blasters {mentos and soft drink}
Lab work {we made flubber}
Sink and destroy {dropped things into the bath, if it sinks your team gets a point} 
Magnitude {pick things up with a magnet, if it sticks your team gets a point} 
And for the finale we basically just blew a range of things up in the microwave. Huge hit. Soap, CD, empty chip packet, marshmallow, steel wool etc.

There are actually companies that will come and conduct science experiments for kids parties for around $300. Not in my area and at that price I wouldn't bother because the kids were impressed with my lame experiments anyway.


OK one of my biggest problems was the size of my outdoor table. It's HUGE. 2.5mtrs long and 1.10mtrs wide. I struggled to fill it with stuff. Boxes covered in foil made it look less 'too big' and gave the cake a bit of a boost. It was the smallest volcano ever. 


One box was covered in specimen jars that Fyn had fun making. The jars are from my mum, for some unknown reason she keeps empty jars? Weird but handy. Fyn choose some of his toys covered them in water and added a couple of drops of yellow food colouring. I got a fish for the large jar and some noodles for another.  Again you can get some spooky ideas and labels online for halloween specimen jars which would be awesome for a mad science party. My labels were very boring official looking though. 


The other box had some science looking vinegar jars. And a vase I owned that looked like a beaker {ikea} filled with water, food colouring and dry ice from here. Dry ice is cheap but there's not much choice in my area so I payed a high price, $9 for a kilo of pellets. Although he gave me about 3 kilos to keep it solid for longer. It was the most awesome thing about the party and perfect for 8 year old boys.


To make the huge blackboard I got a big sheet of MDF from bunnings cut to size, that is a total cost of $10. Blackboard paint is $12 but I got the big tub for $15 just in case. In true procrastination style I only painted it the night before the party, which is when I found out you need a primer for MDF, at least 2 coats and a total of 3 days to paint. With no choice Fyn and I just did one coat with no primer, it worked out fine and I had lots of paint left over. Phew.


Ready for paint.


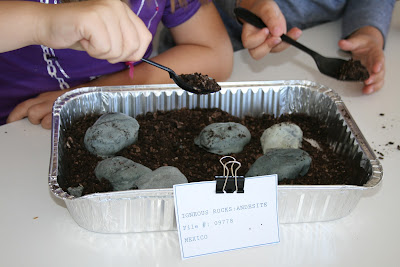
Cake pops: Cake and icing in a food processor blitzed into one big cake ball. {I used a chocolate cake roll that comes with icing inside it} shape into {in my case} various ugly rock shapes. Dip in white chocolate coloured with black food colouring. I used a couple of different shades to get that realistic marbled rock look. Place on a bed of dirt {Oreos blitzed in the food processor} and serve in a foil tray. You can buy candy chocolate rocks that are completely realistic, I only thought of that the day before the party though. Not a genius. 

Spider station: A couple of sauce containers. Blue is ice-cream topping, green is very diluted jelly. Those cheap vases again full of sprite and a bit of ice-cream in the cups just before serving. 

Jelly bugs: You can buy these jars online 20 for $9 but these were free from my doctor. Worm lollies in clear jelly. To make clear jelly you buy the 'make your own flavour' jelly. I added sprite to mine, they tasted good and were a big hit. Probably because the kids do not know what these jars are used for! 

Cookies: I found this cutter in my play dough supplies dipped the bottom in red icing and covered in pop rocks. 

Cake: Lots of cool volcano cakes online, basically you place a cup in the centre of the cake and fill with dry ice pellets. Pour some water coloured with red jelly crystals into the cup and then watch it erupt and bubble over with lava. Awesome. 


As a twist of lazy fate my lights are still purple
from the last party, looked extra cool.


We erupted this volcano so many times the jelly set in the cup.

Take home containers.

Foil pie tins for plates.

Flubber station.

This was a really cheap party and the kids had a great time. Fyn had a great time planning it all with me too. So proud to have a party planning son!


Best dirt ever!